Showing posts with label Home inspection. Show all posts

Wednesday, August 24, 2016

Evolving commercial drone use laws

I hope you are having a prosperous summer!

Although not directly related to home inspections, I wanted to share with you updates to FAA commercial drone use law as I know some of you are using drones for inspections and property video montages.

The FAA has released a new set of rules for commercial use drones weighing up to 55lb that come in to effect August 29, 2016. Click here for the official summary.
  • Must be 16 years old and have a remote pilot certificate with a small UAS rating, or be directly supervised by someone with such certification.
  • To qualify for a remote pilot certification, pass an FAA approved aeronautical knowledge test, or have a non-student Part 61 pilot certificate (TSA conducts a security background check).
  • Operators to ensure drone is safe before flying.
  • Use limited to daylight hours.
  • Fly up to 400' in the air, or higher if within 400' of a structure.
Last year, California Governor Jerry Brown vetoed SB142 that attempted to restrict the use of drones flying over private property. Here is a link to an informative article by Dirk Dallas on the issues facing drone regulation in California.

On a side note, use of drones for deliveries is still banned, but the FAA has allowed Google's X Division to test their drone delivery system, Project Wing.

CA Pro Home Inspection: helping clients make more informed decisions

Tuesday, March 29, 2016

Safety Glass 101

I inspected a duplex last week that had glass sliding doors. The doors were in poor condition, but I was more concerned that they did not contain safety glass. Safety glass is designed to minimize physical damage in case of glass breakage. Safety glass must contain an identifying label that can not be removed (acid-etched, sand blasted etc). Safety glass is usually laminated or tempered. 
 
Laminated glass is two layers of glass sandwiched with a laminate. The laminate is the reason why the pieces are held together when it is broken. 

Sometimes you can identify unlabeled laminate glass by examining the reflection of your hand or some other object- you should see two different images.


Tempered glass is almost 5 to 10 times stronger when compared to its untempered counterpart. Tempered glass shatters into tiny fragments with rounded edges when it’s broken. It can take a higher load and deflects further before breaking, but can not be reworked.

Tempered glass can also be identified through polarized glasses when viewed from an angle. Black lines, a result of the heating and cooling process, should appear as your angle from the glass surface increases when you approach the glass’s side.

However, when uncertain, and in potential hazardous areas, I always assume that glass is not safety glass and recommend further assessment.

If you are interested in more information on when safety glass is required, here is a link to the International Residential Code R308.4


CA Pro Home Inspection, serving Santa Barbara and Ventura Counties

Friday, January 22, 2016

Inadequate combustion air

COMBUSTION AIR

There are many different elements I inspect when examining gas furnaces- leaks, missing drip-leg and shut-off valve, rusting, inappropriate materials, burner flame patterns, heat exchanger damage etc. Another thing I check is the presence of combustion air.

In older homes, I find gas furnaces in small, poorly vented closets, but sometimes, even an enclosed garage with a gas water heater, gas furnace, and gas dryer may not have adequate combustion air.

For a furnace to work properly, it must have an adequate supply of combustion air to ‘feed’ the furnace. Gas furnaces also require a secondary source of air (‘draft air’) to maintain an appropriate exhaust - to help maintain chimney draft.


What’s an adequate supply of combustion air?

Standard of practice is 50 cubic feet of air for every cubic foot of gas (i).

If a gas furnace is rated at 100,000 BTU’s per hour, it will burn approximately 100 cubic feet of gas per hour (one cubic foot of natural gas contains about 1,000 BTUs).

Therefore, it will need approximately 5,000 cubic feet of combustion air.


Total appliance BTU’s / 1,000 x 50 = cubic feet required


As you can see, a small closet that has no door vent, and a small opening in the ceiling, may not have enough combustion air for the furnace to function correctly.

Why is this important?
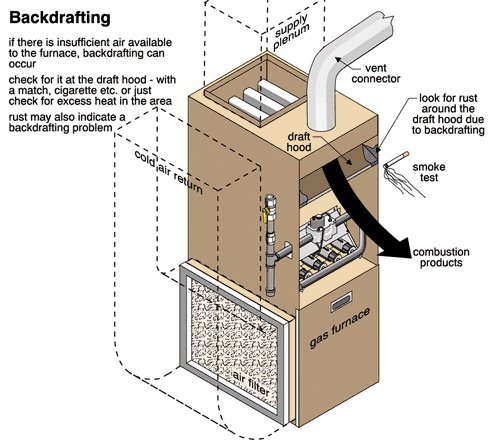
Inadequate air intake can lead to increased levels of carbon monoxide (CO- a poisonous gas). Secondly, a lack of ‘draft air’ is likely to result in backdraft. This means combustion product (CO) can go back in to the room, rather than up the chimney/flue (because the room is under low pressure having been starved for air because its been pulled in to the furnace for the combustion and dilution process).

To test for backdrafting, you can put your hand in to the base of the draft-hood, you should be able to feel cool air being drawn in. If you feel hot, wet exhaust air, then spillage/backdrafting is taking place. Rust around the draft hood may also indicate a chronic backdrafting problem.

Making sure a gas furnace (and other gas appliances) have appropriate combustion air is crucial to the safety of the home owner.

Helpful links-
http://osfm.fire.ca.gov/strucfireengineer/pdf/bml/Frequently%20asked%20questions%20on%20Carbon%20Monoxide.pdf

http://www.homesafe.com/coalert/detect.htm
 
Source (i): Principals of Home Inspection, Carson Dunlop & Associates, 2008

Tuesday, July 28, 2015

What's Wrong With This Panel?


Wire size? Cloth sheathing? Aluminum wiring? Crowded?
No.

This electrical panel box does not have a main disconnect breaker to switch off all power. There must be a way to switch off all electrical service to the home.

There are some instances where not having a main breaker is acceptable, as long as power to the panel can be shut-off in 6 throws or less (the "Six Throw Rule"). But this panel has 12 breakers, and has been upgraded (i.e. no 'grandfather rule'... and even so, you would be well advised to install a main disconnect breaker).
 
In my home inspection report I listed this issue as a 'Potential Safety Hazard' and recommended that a licensed electrician evaluate the panel.

CA PRO HOME INSPECTION

Monday, February 9, 2015

Reduce your pressure... eat cookies!

Home water regulator

A water pressure regulator valve is usually positioned on a home’s main water supply to regulate water pressure from the water company/City to the home. When inspecting homes, I attach a pressure gauge to a spigot or faucet to measure a home’s water pressure. Ideally you want the pressure to be under 80psi. Why? Too much pressure may cause pipes to leak and damage water using appliances. Too little water pressure may cause you frustration trying to have a shower!

Making sure the water pressure regulator is working and set correctly is usually an easy fix. A pressure gauge costs about $5-$10, and an adjustable wrench (maybe a flathead screwdriver) is all you need to adjust the regulator. Click here to view a “how-to” video.


Let them eat cookies!

It’s Girl Scout Cookie Season and my Troop is selling cookies to raise funds for our activities and service projects. Please contact me with a list of cookies you would like to order. We will deliver to your office free of charge! Appreciate your support.


To schedule a home inspection please call me 805-896-8301, or email me (I might even turn up with a complimentary box of cookies!)

Sincerely,Kelsey

Servicing Santa Barbara and Ventura Counties, California

Wednesday, December 17, 2014

Light Up Your Christmas

'Tis the season to hang lights!

A few tips to make the job easier and safer...
Before installing your lights, plug them in to ensure they work.

Never use nails or tacks to secure lights.

Plug lights in to a GFCI outlet (protects from over current), with a cover.

Use a timer for your lights; make sure they are off before you go to bed, or if you are away from home overnight.

If you are using extension chords, make sure they are rated for outdoor use. Make sure your Christmas lights are also rated for exterior use.

Tape chords down that cross any walkways.

Know your electrical load. Amps x volts = Maximum wattage.
Find the amps by checking the outlet’s corresponding breaker (in the breaker box). Multiply the number of amps by 120 (most homes have 120 volts that run through an outlet). The result is the maximum wattage a circuit can handle. A 15-amp circuit can handle lights totaling 1,800 watts, and a 20-amp circuit can handle 2,400 watts.


25-bulb strands can be daisy chained (usually up to 3 strands). Never daisy-chain strands with 100 lights.

When bulbs burn out, you need to replace them, otherwise more current is driven to the other bulbs, which will ultimately shorten their lives, and potentially overpower them.

Lights that use C7 and C9 bulbs are coned-shaped, slightly larger, and if a bulb fails it only effects itself.

LED’s light strands will save energy and won’t overheat. You can also daisy-chain more of them together.

For every 1 foot of tree height, you need 100 lights. String lights in the center of the tree so it looks like it is lit from within.

Always follow manufacturers guidelines in regard to safety instructions.

To store lights, find a stiff piece of cardboard, then cut a slit every inch all the way down on both sides. Start wrapping at one end and go from end to end, sticking light strings in each slot as you wrap the lights. Another trick is to wrap them around an old ball- wrap 5 times in one direction, turn the ball 90 degrees and repeat.

If you are looking for some Christmas light hanging inspiration, look no further…


HAPPY HOLIDAYS!


To schedule a professional home inspection, or for maintenance issues, please contact us at-
w 805-284-9437
* Same day reports* AHIT Certified* Insured* Santa Barbara based home inspector

Tuesday, November 18, 2014

Why Won't My Heater Turn On?

How to troubleshoot a furnace that will not start.

Winter is just around the corner and people are starting to turn on their heaters/furnace… but no heat!

These steps may seem simple, but I’ve been called out multiple times already to look at 'broken' furnaces that just needed their pilot lights relit. Here is a checklist to run through-
  1. Is the gas to the furnace turned on? The supply pipe handle should be parallel to the gas line.
  2. Check the pilot light, and follow the unit’s instructions to relight (FYI clean any dust away that may have accumulated over the summer).
  3. Has the circuit breaker to the gas or electric unit tripped? Reset if necessary. 
  4. Check the thermostat. For electrical thermostats-
    1. Make sure the heat function is on and the thermostat temperature is set at least 5 degrees higher than the ambient temperature. Works… great! Fails… next…
    2. Turn off power to the furnace, remove the thermostat cover check the battery, fuse (replace if expired or damaged), and clean off any dust with a small brush or pressurized air. Turn power back on and attempt to turn the furnace on. Works… great! Fails… next…
    3. With the power off, unscrew the red and white wires from their terminals (or the wires labeled “R” or “Rh” and “W”), and wrap those wires together. Turn power on. If the furnace ignites, then the thermostat is defective (replace thermostat).
      1. If the furnace does not light, then check that there is continuity (electrical test to determine if an electrical path can be established between two points) from the wires to the furnace. If continuity test fails, call a qualified technician to assist.

Hope this information helps you and your clients. And if you need help lighting pilots or testing a thermostat, I’m available to help :-)

Sincerely,
Kelsey

CA Pro Home Inspection, Home Inspection & Maintenance
To schedule a professional home inspection, or for maintenance issues, please contact me at-
blogger@caprohomeinspection.com
w 805-284-9437

* Same day reports
* AHIT Certified
* Insured
* Santa Barbara based home inspector

Wednesday, September 17, 2014

Pool, hot tub and spa safety


In my inspections it is common to find gates to hot tubs that do not latch properly. Many homeowners mistakenly don’t consider hot tubs to be a pool area.

The Safety Code defines a swimming pool as any swimming or recreational bathing over 18 inches deep, which includes hot tubs and spas. All home owners, must comply with the 2007 Swimming Pool Safety Act of the California Health and Safety Code. 

Broken self-closing device on gate to hot tub.

The act requires homeowners to install at least one of seven drowning prevention safety features on new or remodeled pools.
  1. The pool shall be isolated from access to a home by an enclosure (see 'enclosure requirements' below).
  2. Removable mesh pool fencing in conjunction with a gate that is self closing and self latching, and can accommodate a key lockable device.
  3. Pool shall be equipped with an approved safety cover.
  4. Residence equipped with exit alarms on those doors providing direct access to the pool.
  5. All doors providing direct access from the home to the swimming pool shall be equipped with a self-closing, self-latching device with a release mechanism placed no lower than 54 inches above the floor.
  6. Swimming pool alarms that, when placed in pools, will sound upon detection of accidental or unauthorized entrance into the water.
  7. Other means of protection, if the degree of protection afforded is equal to or greater than that afforded by any of the devices mentioned above.

A note about enclosure requirements-
  • Gates must open away from the pool.
  • Be self closing and self latching (device no lower than 60” from the ground)
  • No more than 2” gap between the ground and the gate.
  • Any gaps in the in the fence must be no wider than 4”.
  • Exterior surface free from any characteristics that could be used as a foot or hand hold for a child under the age of 5 to climb over.
Gate latch is not self closing or self latching.

So, fortunately gate latches are an easy fix for the home owner- but definitely an important one!


To schedule a professional home inspection please visit CA Pro Home Inspection, servicing Santa Barbara and Ventura Counties, ph (805) 284-9437, blogger@caprohomeinspection.com


Reference:

Tuesday, July 15, 2014

What's Up With My Loo!

Many people seem to have a phobia about lifting their toilet tank cover- but many problems with noisy toilets (the loo!), constant running water, and overfilling are really a very quick homeowner fix. So take a peak under the toilet tank lid with us...


RUNNING TOILET
Often people will 'jiggle' the toilet handle (trip lever) to stop toilet water running.

1. The problem is usually the toilet flush valve (flapper) chain getting caught under the flapper, preventing the flapper from sealing the tank drain. Simply adjust the length of chain so it dose not get caught in the flapper.
Sometimes the float-ball may also get caught on the flapper chain, requiring you to slightly bend the float-ball arm to prevent the chain from catching.

2. The float-ball may be set too high, causing the toilet to continually fill with water. You can lower the height of the float by adjusting the screws on top of the ballcock; or for floats attached to the ballcock, via adjusting the rod height (see pic below).

3. Finally the plastic flush valve (flapper) may have worn and not sealing the tank drain- so replace the flapper.

Link to good photo instruction on how to fix these toilet issues.

Float on ballcock: adjust rod by pinching clip
Float ball: adjust via screws on top of ballcock


NOISES WHEN TOILET FILLS
Usually this means it is time to replace the ballcock- it's not sealing correctly so is creating noisy vibrations. This is a really helpful video link to replacing a ballcock (easy 10 min job).

So don't put up with a malfunctioning toilet... take a peak under the lid and usually you will be able to fix the problem in under 5 minutes!

------
Thanks for reading our blog. To schedule a home inspection please visit CA Pro Home Inspection, servicing Santa Barbara, Ventura and Los Angeles Counties, ph (805) 284-9437, blogger@caprohomeinspection.com